DM-CTC Admin User Guide
Introduction
This guide is intended to assist users (developers, operations personnel, support personnel) that need to manage, monitor and troubleshoot devices using CalAmp’s device management platform, DM-CTC UI
Scope
This guide gives a detailed overview of how to use the DM-CTC features and functionality using UI.
Step-by-step procedures are provided that describe how to perform the following functions:
• Remotely manage CalAmp device groups, firmware updates, and configuration changes
• Monitor device operational status and microservice
• View device firmware updates and configuration change history
• View or modify device configuration
• View or add device files to account
• Set up sub-accounts
• Set up and organize device groups
• Manage users and user permissions for devices and accounts
Audience
- Customer Developers: Customer developers should read this guide to gain a basic understanding of the operation of DM-CTC system. This guide is not intended to be used as a detailed design document or software design specification.
- Operations Personnel / IT Department Staff: All persons required to manage and monitor LMU/TTU/ATU devices, SCI devices and/or manage user accounts.
What is DM-CTC?
DM-CTC is CalAmp’s next-generation device management platform that succeeds PULS. DM-CTC has many powerful and innovative new features and is built on a high-performance architecture and is designed to be consistent and user friendly.
DM-CTC enables automatic provisioning and authentication of the devices, remote configuration and management, monitoring and diagnostics, analytical dashboards, and efficient bulk firmware or software updates and maintenance.
For security and compliance DM-CTC has two different instances US and EU.
Below are the URLs for different instances
US: https://connect.calamp.com
EU: https://connect.calamp.co.uk
DM-CTC dramatically simplifies device management and will significantly improve operational efficiencies related to device provisioning and configuration, support and troubleshooting and general organization of devices and customers. DM-CTC will cut down device provisioning efforts, cut down revenue loss due to delayed device updates, reduce troubleshooting efforts, and increase revenue with advanced security and regulatory compliance.
Using DM-CTC
Account Setup
DM-CTC accounts are automatically set up when a paid-subscription are purchased in conjunction with edge devices, or when devices are migrated from PULS to DM-CTC. For security and compliance DM-CTC has two different instances, US and EU. Accounts will be created in the instance of the customer's choice.
Once the account is created, the customer admin contact provided in the purchase-order will receive a welcome email with the necessary URLs, application keys and credentials with required access for DM-CTC UI, APIs and the CalAmp developer portal.
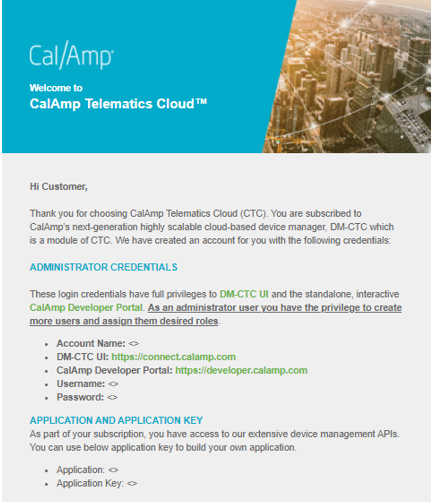
Sample Email
Self-Serve User Management
DM-CTC allows self-serve user management capability to CalAmp customers/users. In addition, DM-CTC allows role-based access where users can be given different level of access to manage accounts, devices, groups, files etc.
Adding Additional Users to an Account
With the Admin credentials, a customer can add more users and assign roles based on the application that they need access to. All users created using the DM-CTC UI will receive credentials to log in via email.
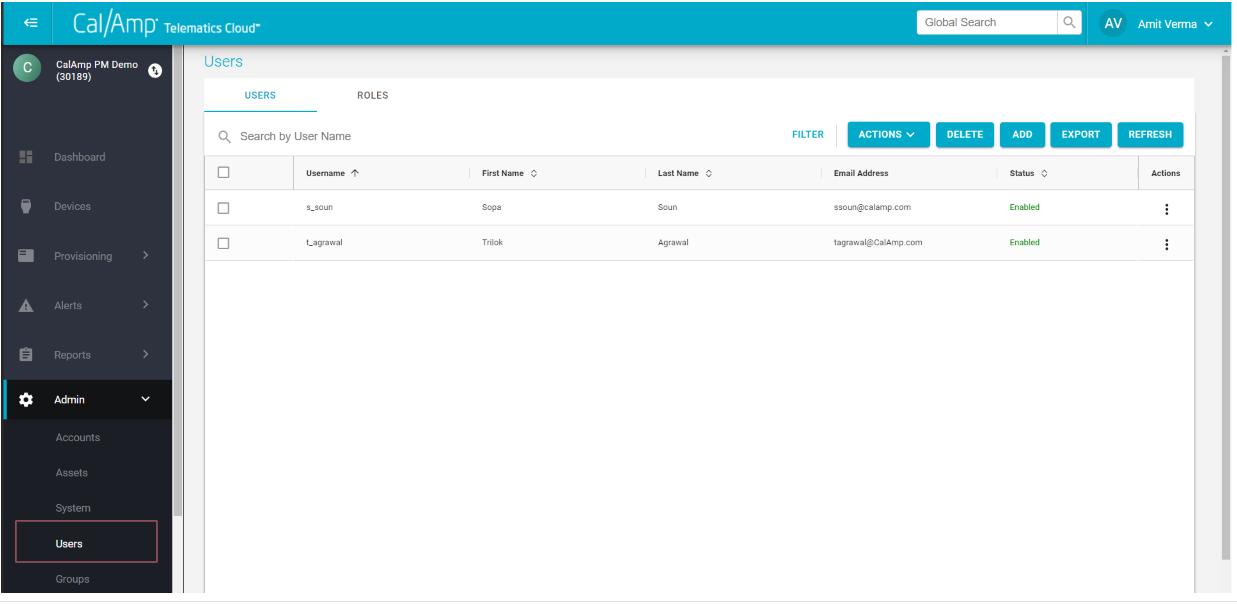
DM-CTC UI
For information on roles for CTC Admin application, please refer to the table below:
Application Name: CTC Admin
| Role Name | Description | Target User | Module Access | Device File Permission | Device Permissions | User Permissions |
|---|---|---|---|---|---|---|
| Customer Admin | Customer Super Admin Role | Super Admin in customer organization | Access to all modules | Create, Read, Update, Delete permissions for Customer files (PEG script, PEG2 script etc.) | Read and Update operation only on devices | Create, Read, Update, Delete permissions on Users |
| CTC Admin - All Features Role | Admin Role without provisioning (remote device update) related permissions | Customer Admin who doesn't need to perform provisioning work | Access to all modules except provisioning. | No file access | Read and Update operation only on devices | Create, Read, Update, Delete permissions on Users |
| Customer Developer | Upload device files such as PEG, PEG2 into account and update devices with Firmware, Script, and other files | Customer User who creates/uploads customer files such as PEG script, PEG2 script etc. in customer organization | Access to all modules | Create, Read, Update, Delete permissions for Customer files (PEG script, PEG2 script etc.) | Read and Update operation only on devices | Read permission Only on Users |
| Customer Provisioning | Update devices with Firmware, Script, and other files | Customer user who update files on devices trough jobs | Access to all modules | Read Only Access | Read and Update operation only on devices | Read permission Only on Users |
| Customer Support | Read Only permissions in UI | Customer support user in customer organization. | Access to all modules | Read Only Access | Read operation only on devices | Read permission Only on Users |
Hierarchical Account Management
With DM-CTC, customer users have access to create sub-accounts under their main accounts. This powerful feature allows the management of select devices in a customer organization or customers organization in a separate account. Through hierarchical account management, device access can be limited to specific users.
As an example, if a user is created at sub-account level, that user will only be able to see/manage devices in that sub-account and the hierarchy beneath it.
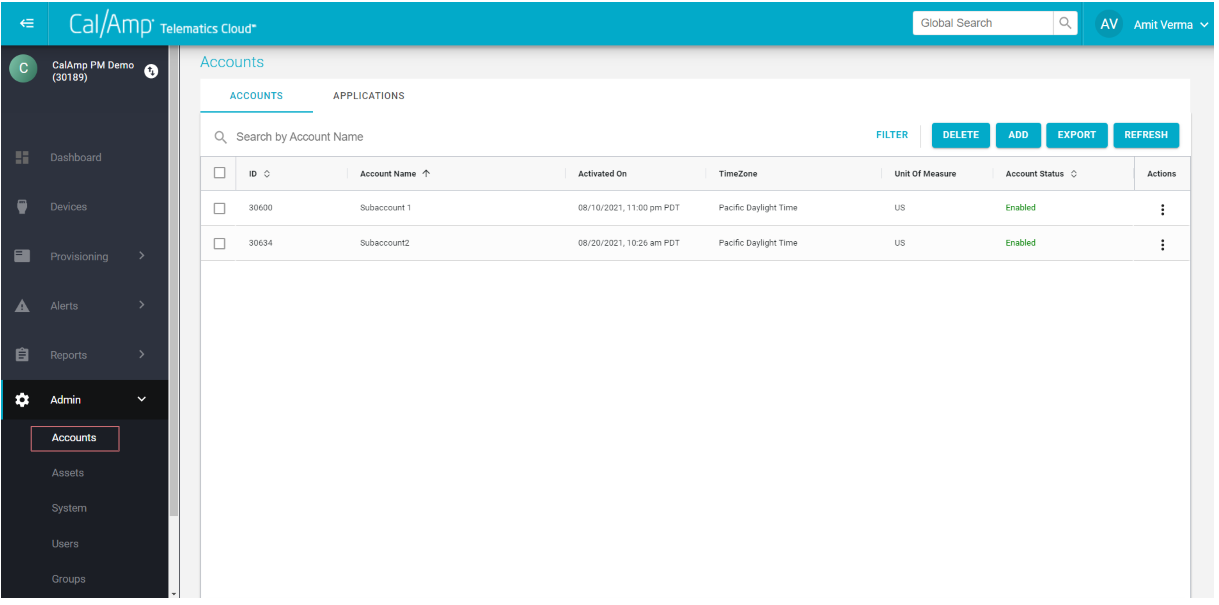
Account View
To create a sub-account:
- Go to Admin>Accounts and Click on Add.
- Provide the account name.
Click on Next to assign CTC Admin (for UI access to users) and DM Admin (for device management in account) application to the account. Click on Next to add details or skip to the last section and confirm.
Once the account is created, please navigate to sub-account by using steps mentioned in the Account Switcher section below to create users under that account with the required roles.
DM-CTC UI Overview
The DM-CTC web interface has been tested to run in Microsoft Internet Explorer version 6.0 or greater and can be used to configure and manage accounts, gateway devices, SCI devices, users, assets and groups.
Logging In
To log in to the DM-CTC web interface:
- Open the web browser.
- Use the URL based on your account region:
US: https://connect.calamp.com
EU: https://connect.calamp.co.uk
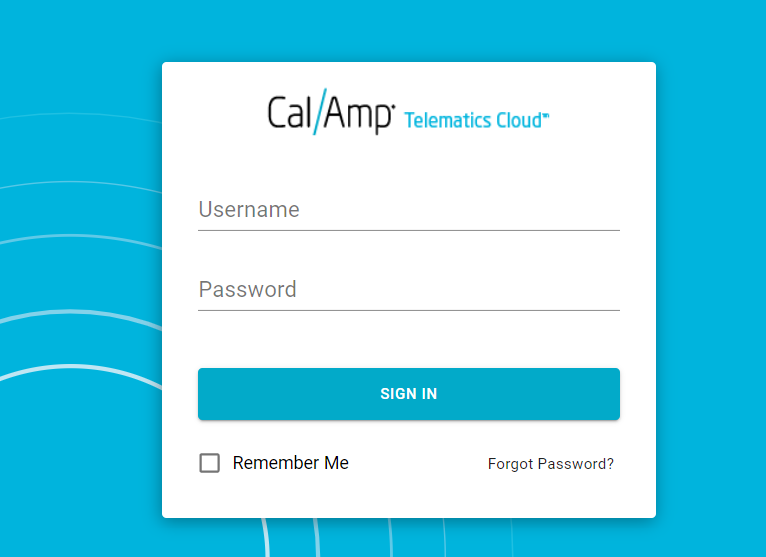
DM-CTC Login Screen
- Type your Username and Password (you will receive an email once your user is created), and click OK
Modules
After successful login, the user will be brought to the DM-CTC UI. The modules highlighted in the screenshot below will help you use different features available for your devices, assets, users, accounts, and groups.
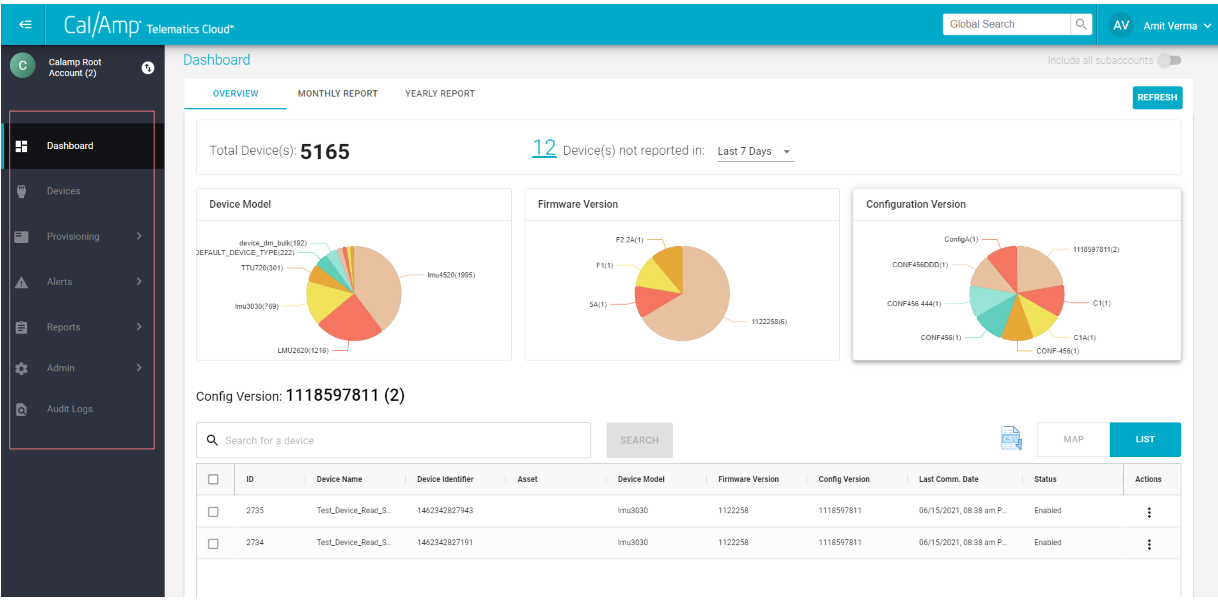
Account Selector
Global Search
At the top right of the CTC screen is the Global Search field that enables you to search a variety of areas in CTC. Type in the search request and hit enter. This will open the Search Results screen and at the top of this window will show the matching results in Accounts, Users, Assets by Name, Assess by VIN, Devices and Groups by Name
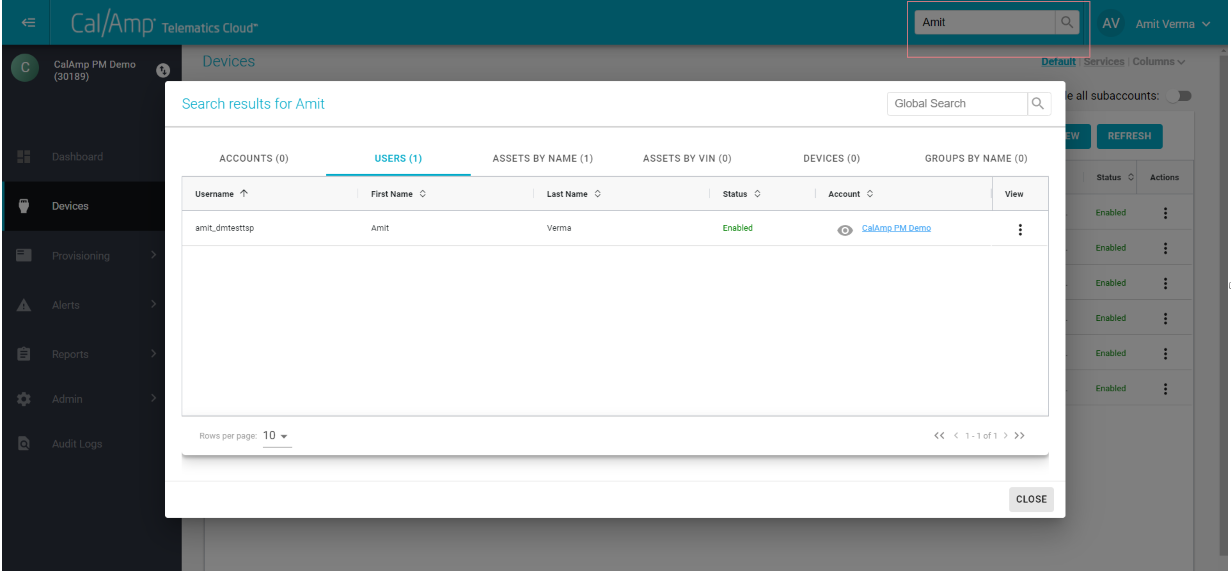
Global Search
Additional Details
On the top right corner is a dropdown button to get access to the DM-CTC User Guide, Developer portal, Privacy Notice/Policy and to sign-out from the logged in account.

Additional Details
Dashboards
DM-CTC provides analytical dashboard to view the breakdown of devices in your account and sub-accounts based on device model, firmware version and configuration version. In addition, one can view how many devices have not been reporting to the system in last 7, 14, 30 and 90 days. All the charts are interactive. One you click on a pie-chart, the results can be seen in the table below. The results can be exported in a .csv file.
NOTE: To view the data of a sub-account's devices as well, please flip the Include Sub-account button on top right corner.
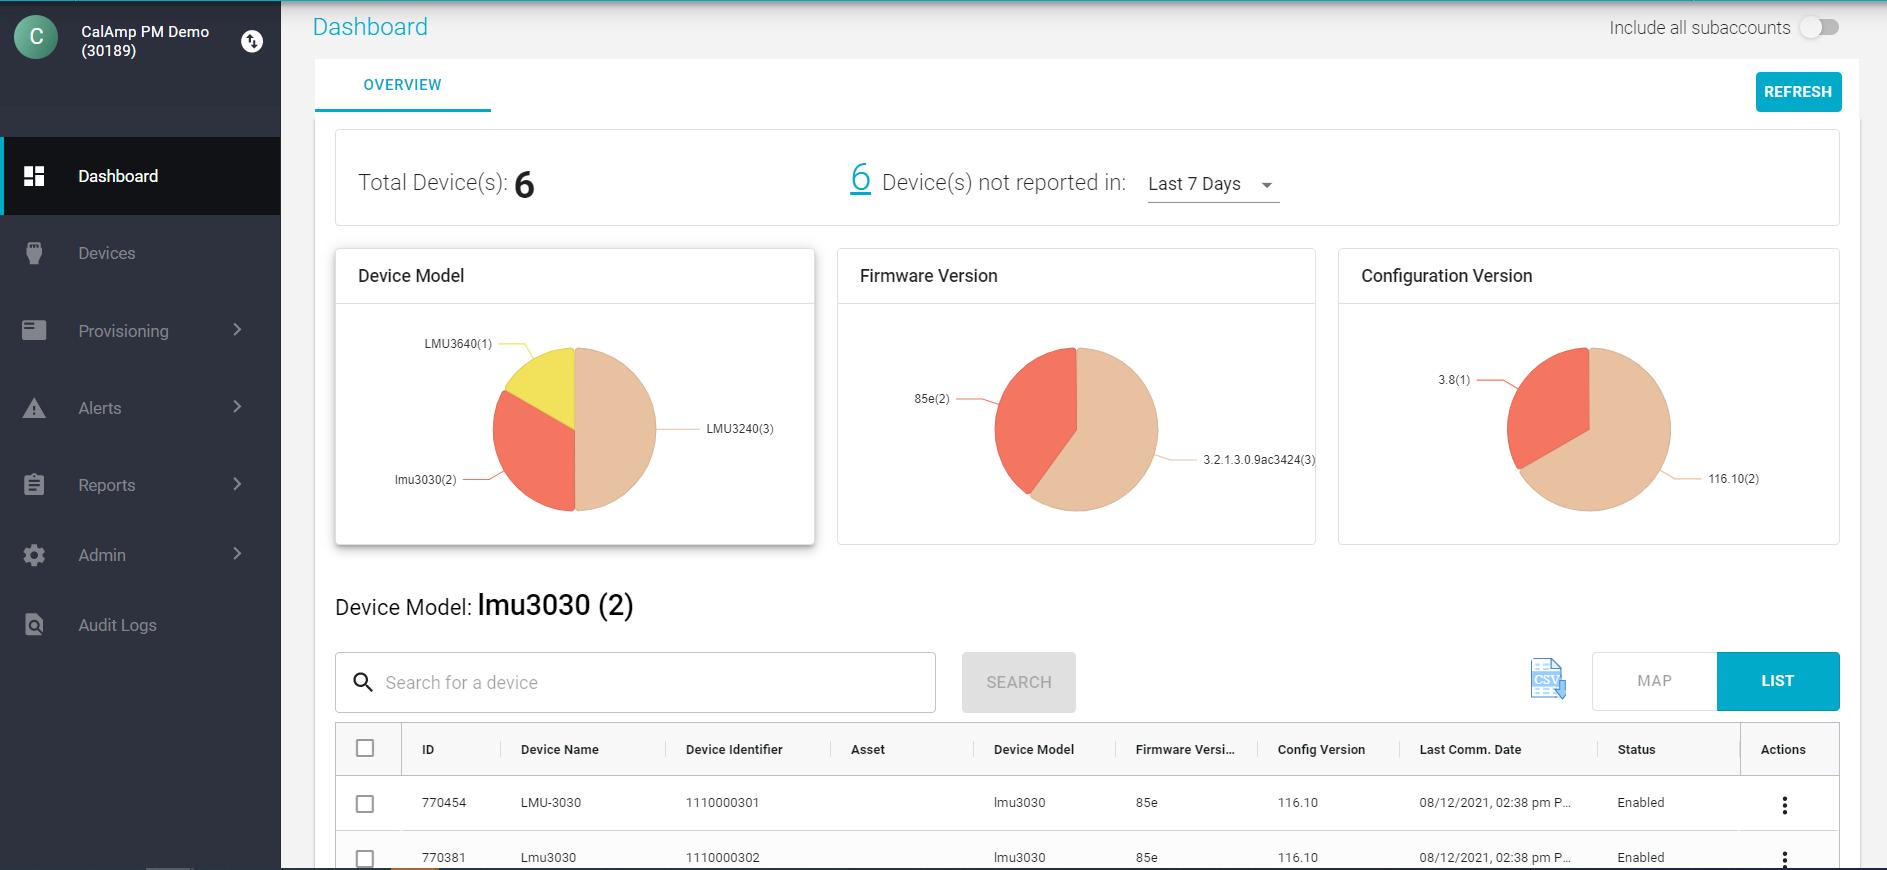
Dashboards
Devices Module
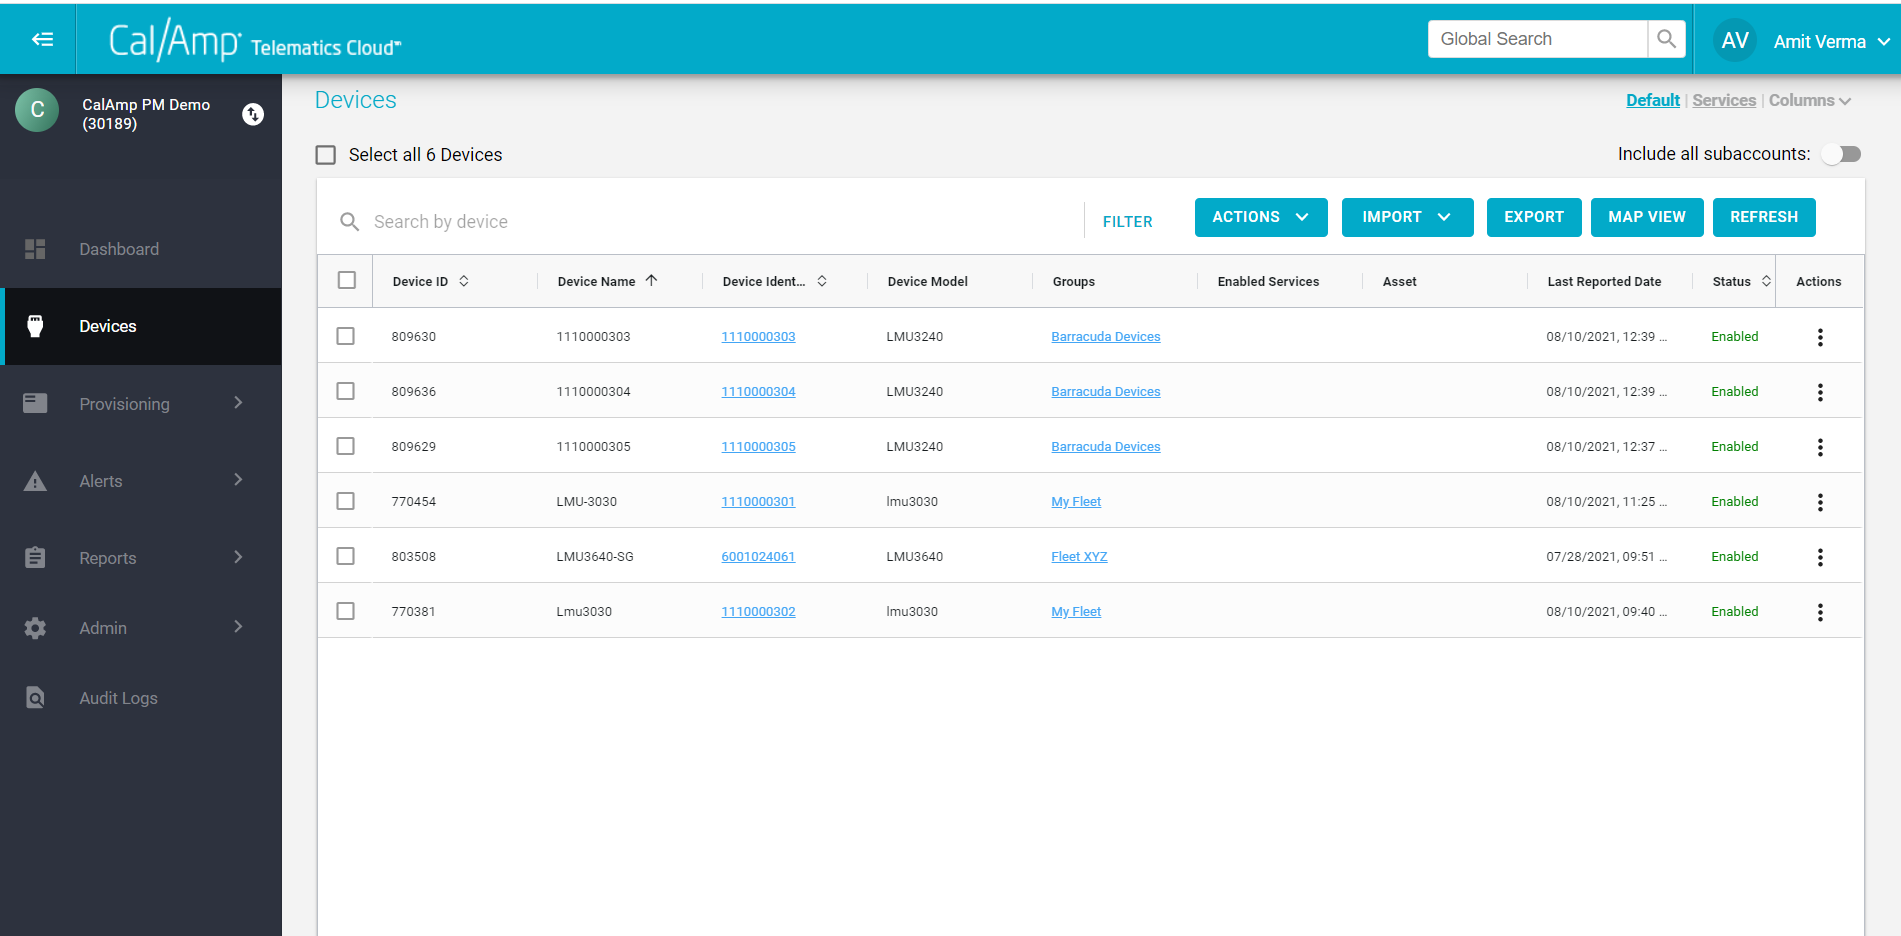
The Devices module shows a list of all devices in the account. This module can be used to view device details, perform actions such as creating groups, jobs etc. There is a default column view for columns displayed in the devices table. One can either use default view, services view or can configure columns by clicking on columns.
Once Columns is clicked, the user may choose columns to view in the grid.
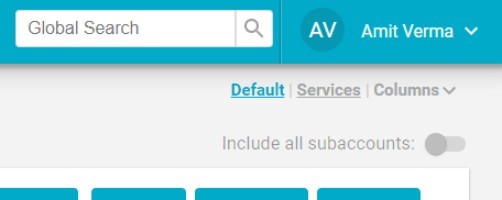
One can either view devices in the account that they are logged into or all devices in sub-accounts by flipping Include all sub-accounts button below the Columns dropdown.
Device Details View
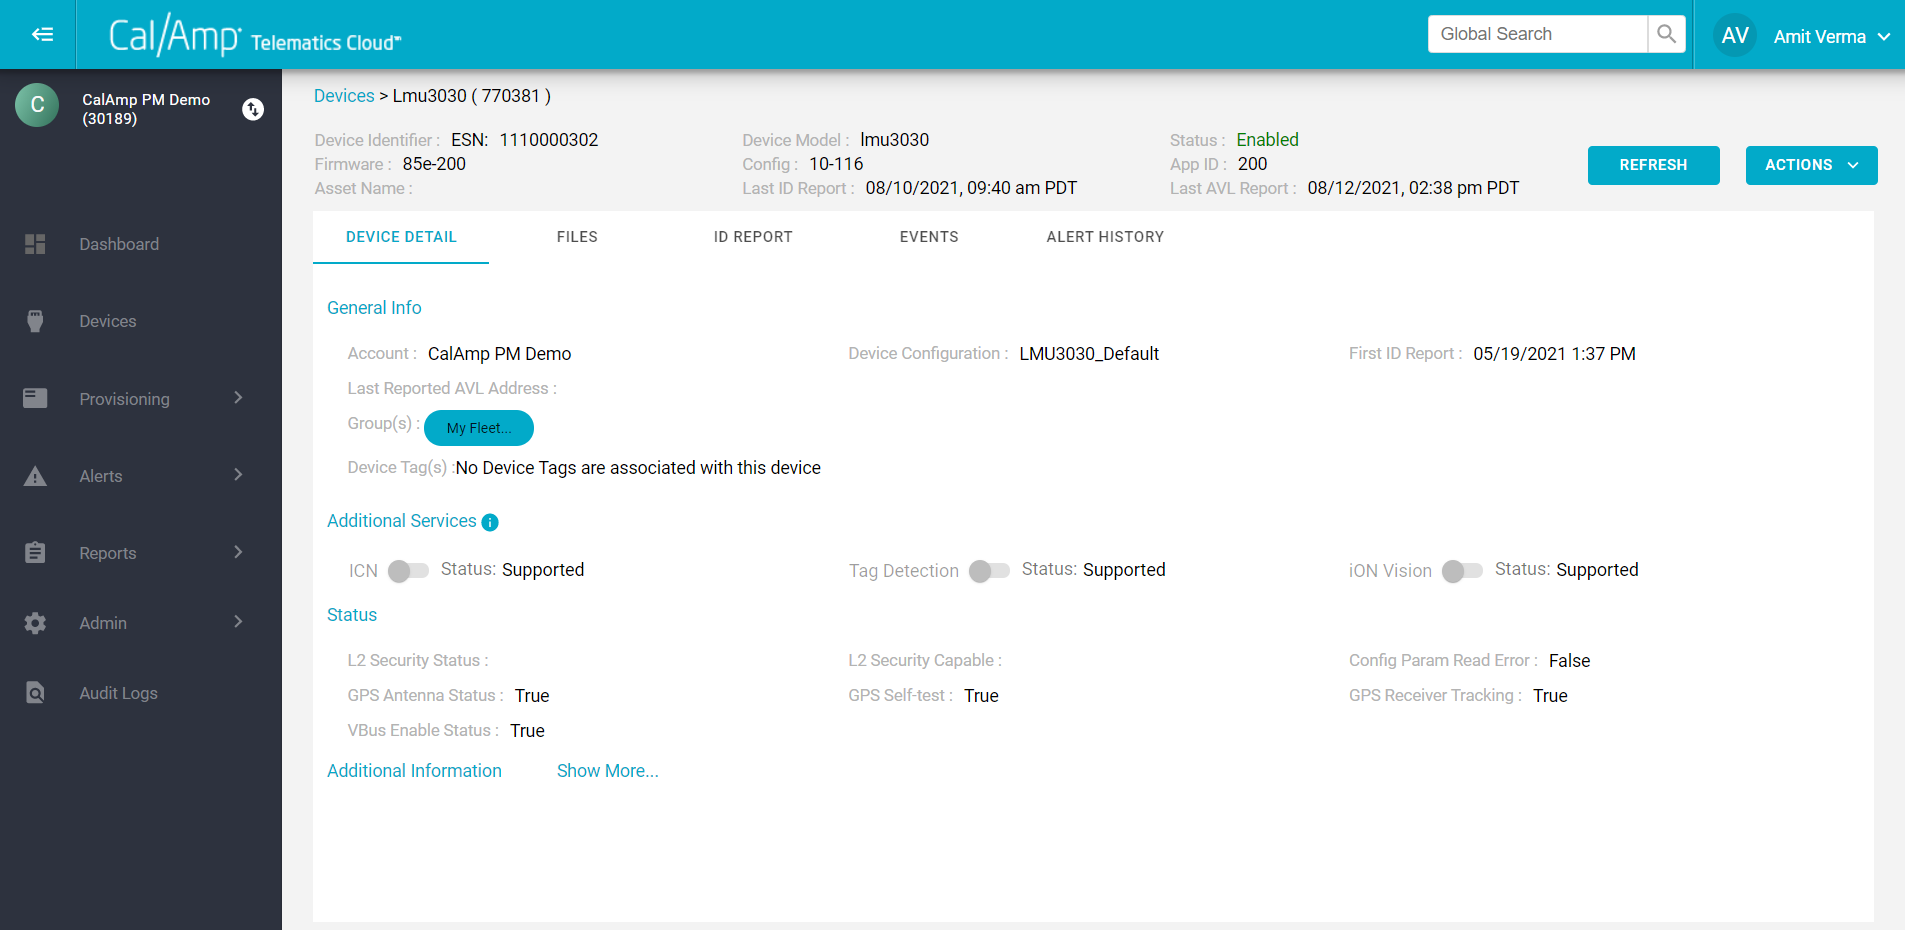
To view device details, click on the 'device identifier' link. Right-click on link and open details in a new tab to view details in an inline view. Alternately, one can click on the last column of a device row and click view to view details in a pop-up window.
Device Details

Device Details
Device Details
One can view details about a device such as Account, Device Configuration etc., Additional services on a device, status of device components or additional information such as IMEI, IMSI etc of a device.
Files
One can view files such as firmware, config etc. on a device in the files tab. Also by looking at a log, one can see view files that were historically assigned to a device. One can use dropdowns for device type and file type to only view files of interest.
ID Report
ID report data can be viewed using this tab. Click on the different tabs under ID report to view different details from ID report.
Events
One can see all the events such as AvlEvents, Dtc Events etc. generated by the device. Use the date to search for events from a particular date as well. Additionally, one can search for specific type of events by choosing event of interest from the Events List dropdown. These results can be exported in a .csv by clicking the Export button.
NOTE: This section is applicable only if your organization use CalAmp Telematics Cloud's Datapump subscription.
Alert History
All the alert notifications based on the alerts set on devices from the Alerts module can be seen under the Alert History tab.
Actions
a. Edit: To edit editable device detail fields
b. Create Job: To update files such as firmware, PEG script etc. to device
c. Move: To move a device to a different account. To do so, select the account of choice. Devices can only be moved in the accounts belonging to that hierarchy. To move devices in accounts not in same hierarchy, please contact the CalAmp Support team.
d. View Audit Log: To view system related logs for the device.
Device Groups
Groups can be created to manage devices. A device can belong to multiple groups.
There are two ways to create groups:
A group can be created from the devices screen.
- Select devices of interest and click on 'Assign group' under Actions button.
A group can also be created from the Admin Module. Click on Admin Module→ Groups - Click Add
- Enter Group Name and Notes
- Click Add
- Choose Devices or Assets and Save
Bulk Edit Group
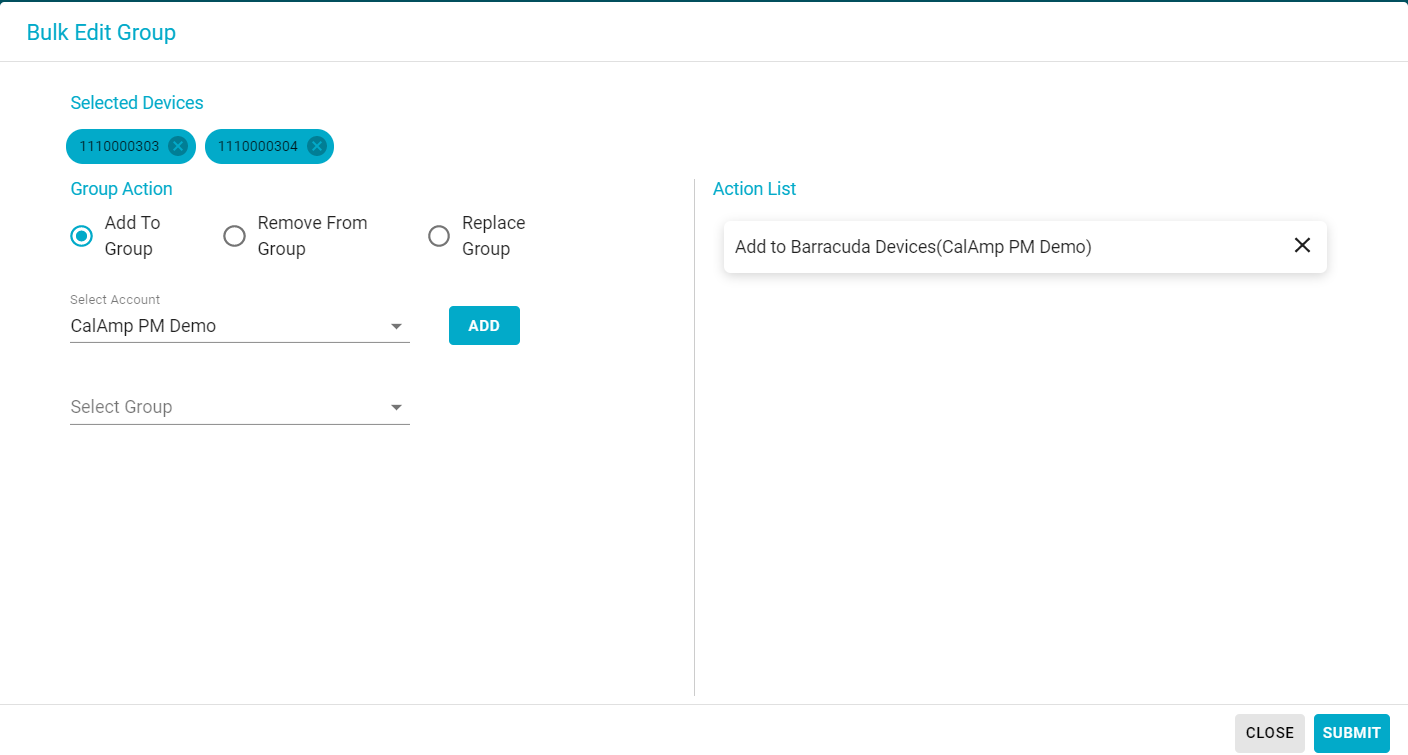
To associate, disassociate or replace group of device in bulk use 'bulk edit group'. Select devices of interest and click on Actions -> Bulk Edit Group. Select the group and click on Add. Click on Submit if the action list looks fine.
Bulk Edit Group
Create Jobs on Devices (File Updates)
All the device file updates in DM-CTC are achieved through a job. A job could have multiple tasks (files). More tasks can be added by clicking on 'Add Task'. The order of tasks can be changed by using the up/down arrows.
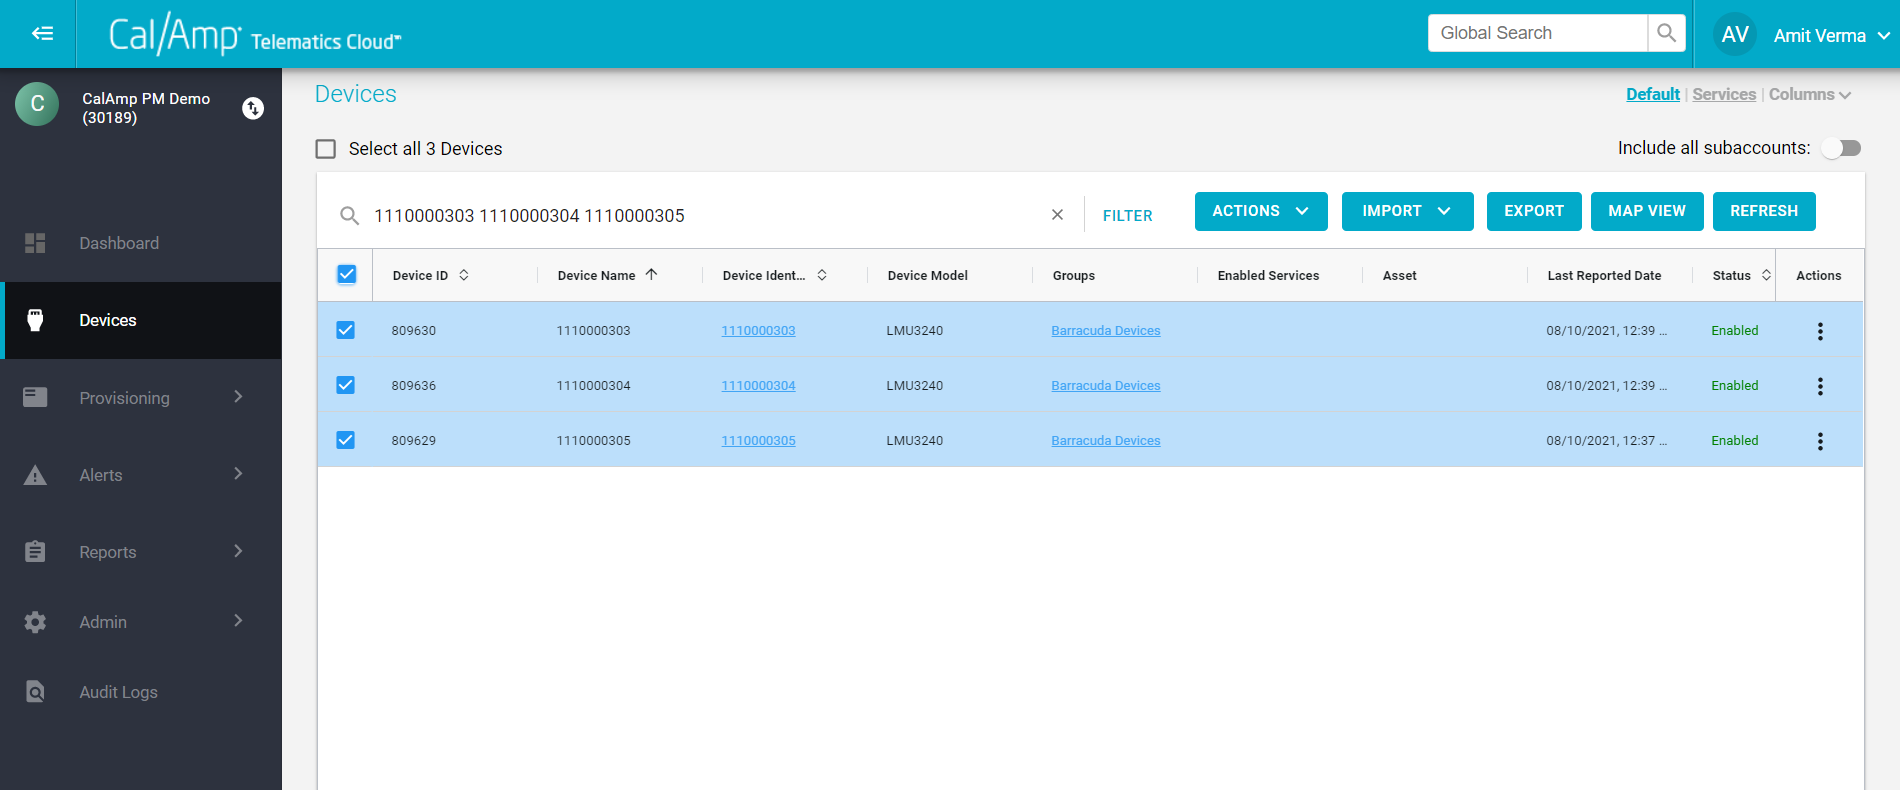
To select devices of your interest for creating a job, DM-CTC has implemented smart search built using leader in search technology, Elastics search. User can click on the device (s) of interest from devices module by clicking on checkbox in the device row from table or copy paste a list of devices (space is required between two device identifiers and device identifiers such as ESN, IMEI etc. can be used) in Search bar see figure below or apply single or multiple filters such as App ID, Firmware version to search and select devices of interest for file updates.
DM-CTC supports ID Type, Value, Model, Device family, Firmware Version, App ID, Config Version, ID Report Time, Enabled/Disabled/Suspended filter types.
Elastic Search
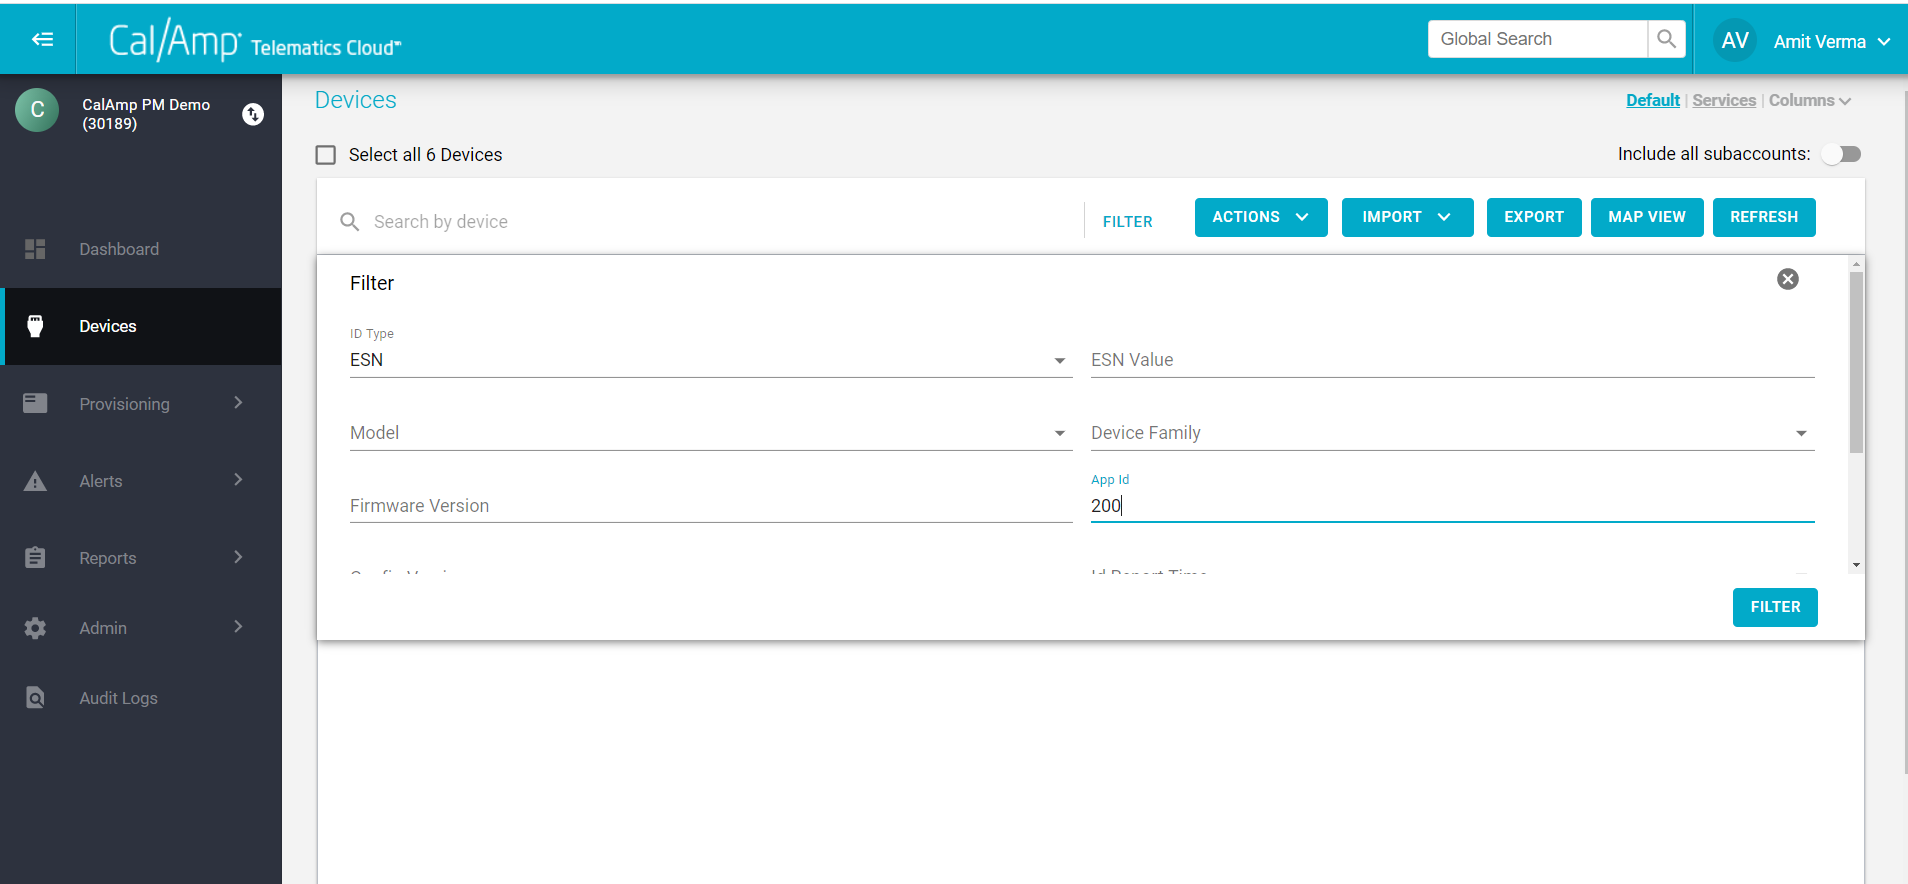
After devices are filtered, click on Select All Devices. Click on create job under the Actions button to create a job on these devices. Give a name to your job, add description (optional).
- For a task, choose device type, file type, and file name
- Set priority order by clicking on the arrow at the end of each row of a task. Tasks can be deleted by clicking on the (--) button on the right of each row.
- Click on Create Job once the job is ready to submit for the devices selected.
Check a Job Status
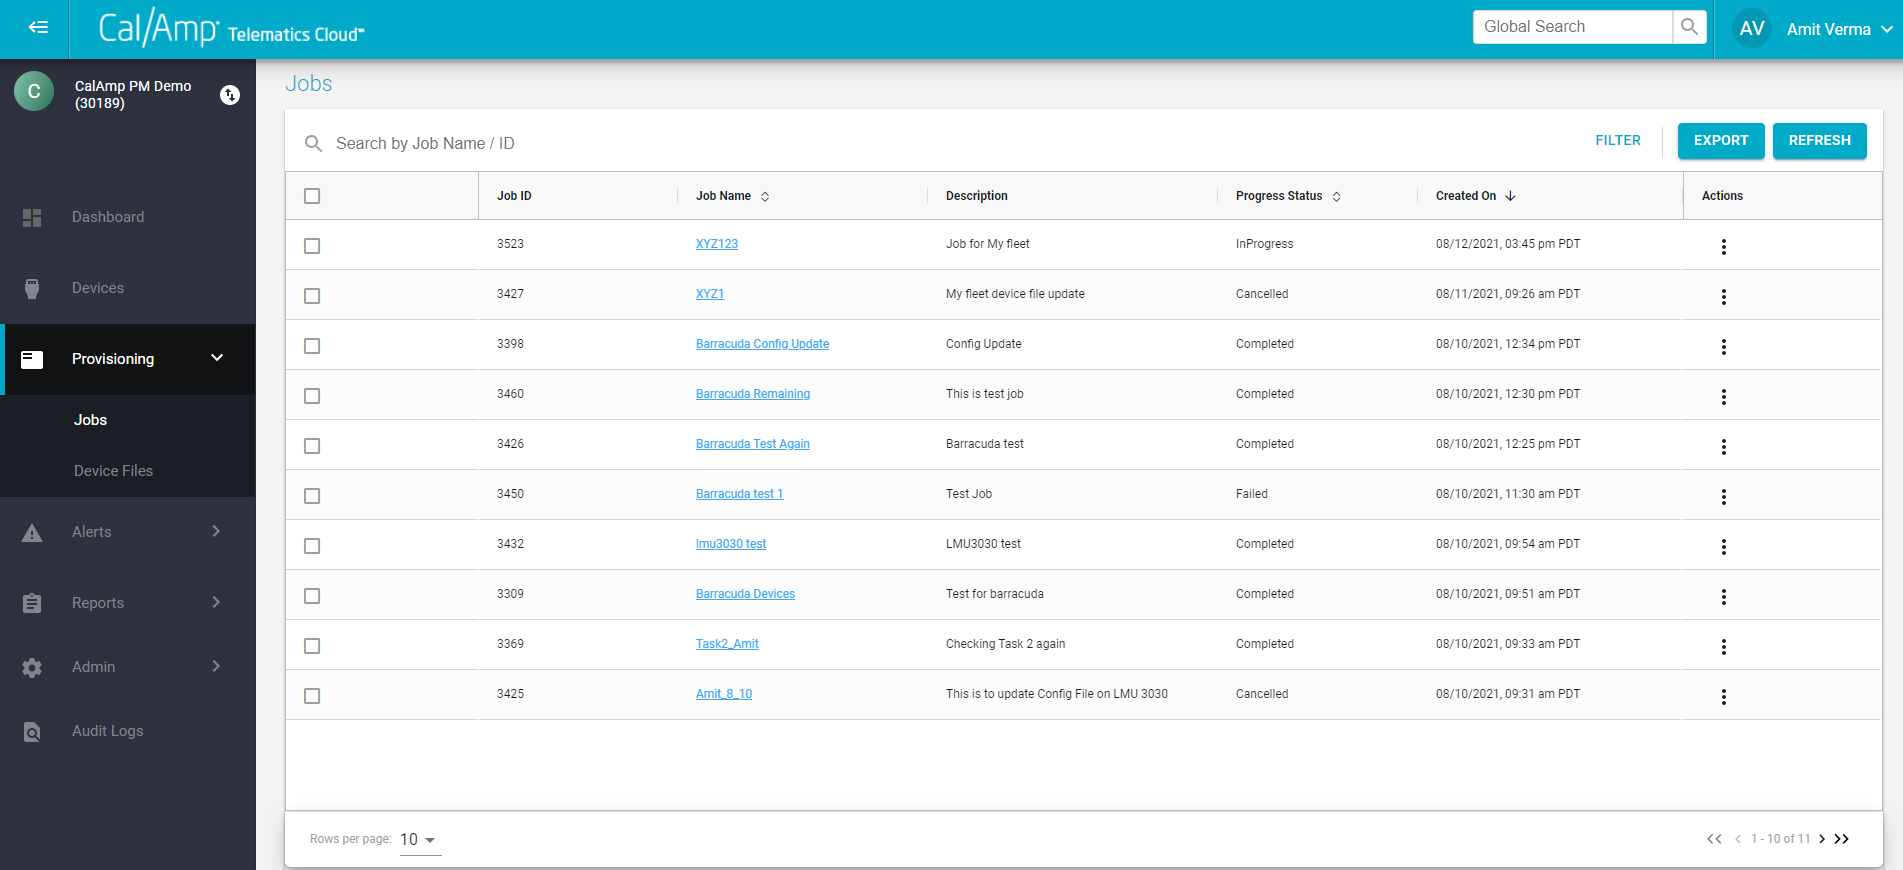
The overall status of a job and individual device status for each task in the job can be checked from the Provisioning Module under the Jobs tab. Jobs can be canceled from the same tab as well.
Note:
Successful tasks (fie updates) on a device cannot be undone by cancellation
Check Jobs Status
Individual Job Status:
Check the Progress Status column to see overall status of job. If a job is submitted recently but hasn’t been processed by the system, the status will be Pending. If a job is submitted to system, the status will change to In Progress. If the system has processed the job, the status will change to Completed or Failed based on the result of job. Search for jobs by Job name or ID or by applying filters for Job statues/creation date from Filters button. Export the results of this page in a .csv file by clicking on the Export button.
Job Details:
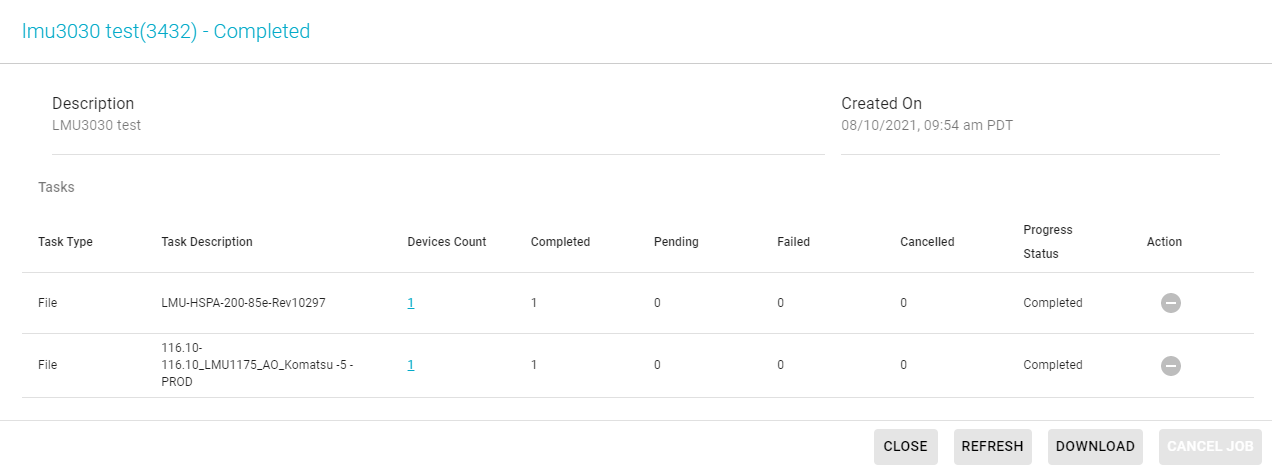
Click on the Job Name URL to view details about a job. A pop-up window will open to display all the tasks (files) and status of each file on devices. Download the job details by clicking on the Download button on bottom right corner of Job Details pop-up window.
Job Details
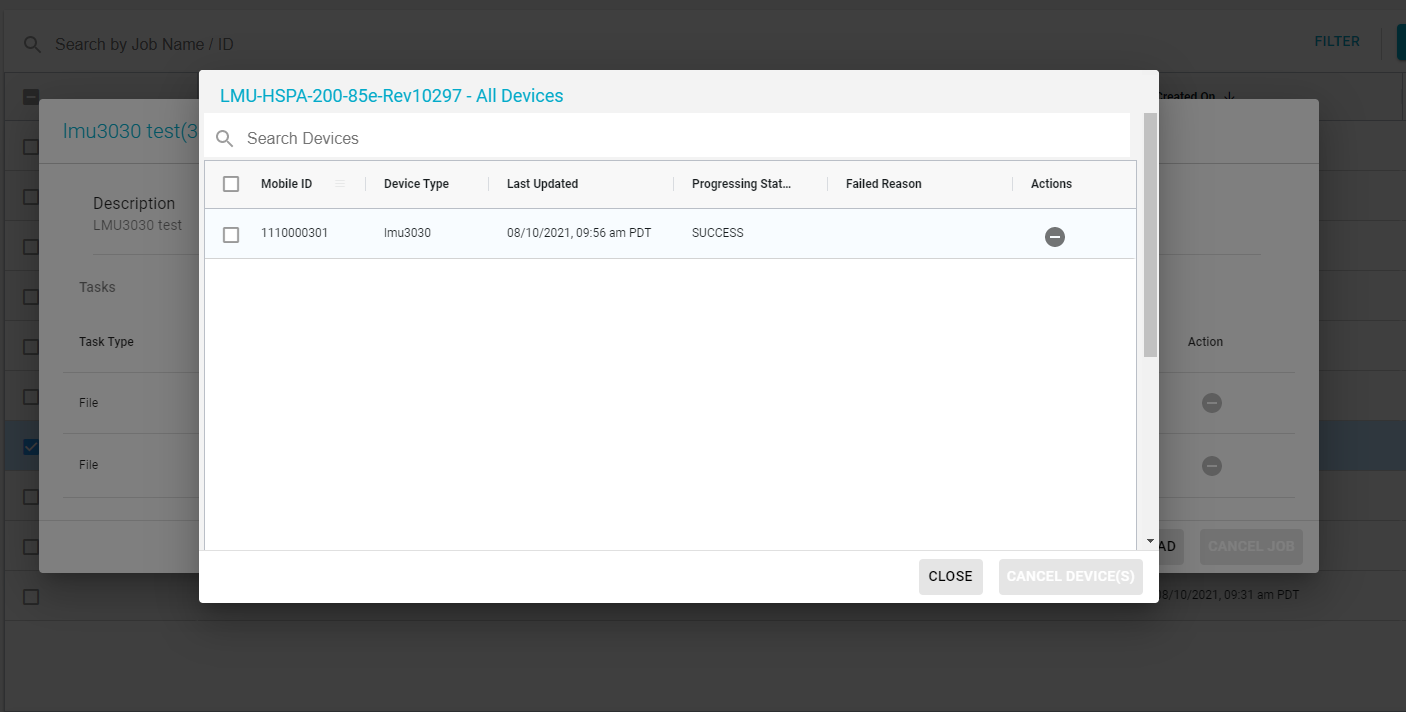
Task Detail - Click on the device count URL in the Job details pop up window to view individual status of file on the devices
Task Detail
Canceling a Task:
To cancel an In-Progress task on the devices selected, please click on (–) under the Actions column to cancel that task for the device. The status of the task will change to Cancelling. Please note that canceling the task will cancel task for all the selected devices. the task can be cancelled for some devices as well.
To cancel task for some devices, click on device count URL for that task. Now click on (–) under the Actions column in each device row.
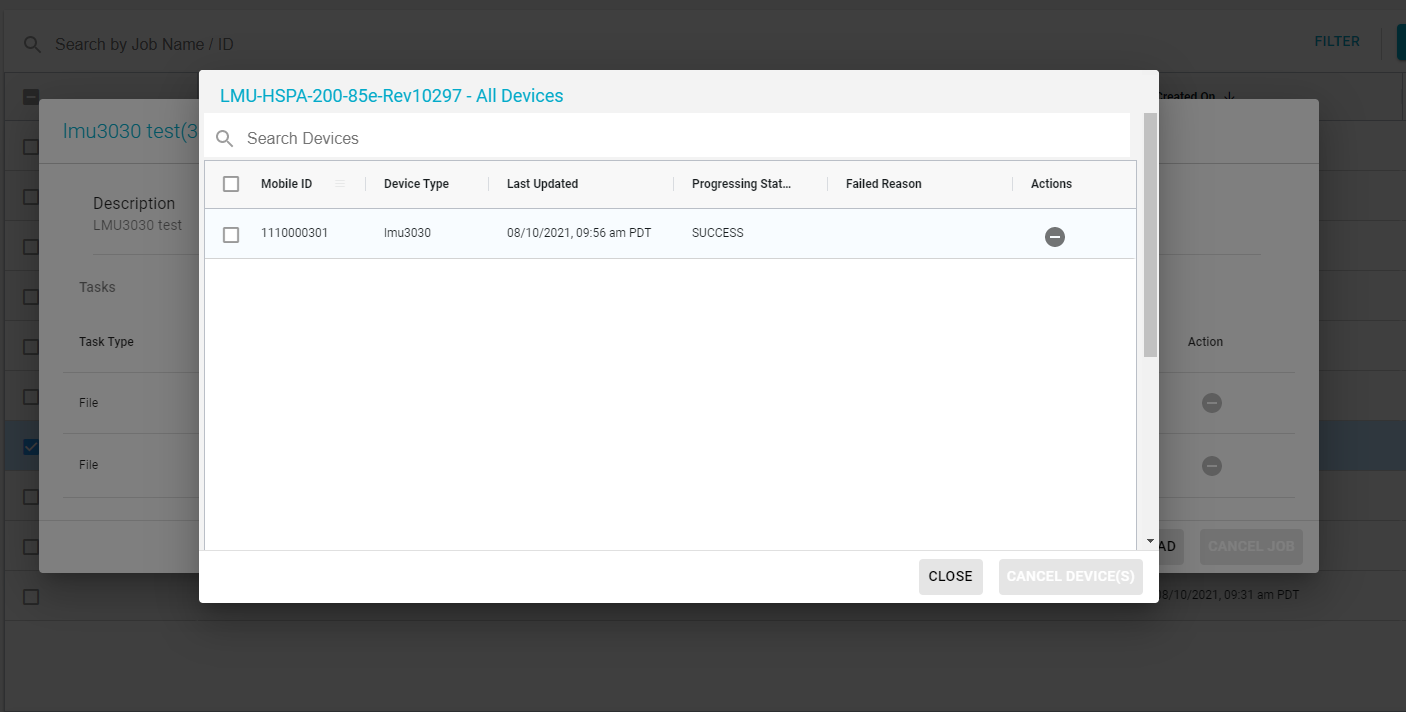
Canceling a Task
Canceling a Job:
Canceling an entire job is done by clicking on the Cancel Job button on the lower right corner of pop-up job details window. the job must not be in a Failed or Completed state. Files that already have been updated on the devices will not be undone by cancelling a job or task.
Adding Files in Account
Add files such as PEG script, PEG2 script, Geozones etc. to an account or sub-accounts form Parent account is done detailed below.
- Click on Provisioning → Device Files and click on 'Add'.
- Choose Device Type and File Type. Select the appropriate options by clicking on Browse for Files.
- Provide File Version
NOTE: Script version will have to be added manually while uploading a script. - Add File Description
- Choose account(s) that can use the file
- Only this account: File will be available for devices in account that user is logged in
- All Sub-accounts: File will be available for devices in account and sub-accounts below in the hierarchy where user is logged in
- Choose Sub-accounts: Enter the sub-account names for which the file should be available.
- Click on Add File
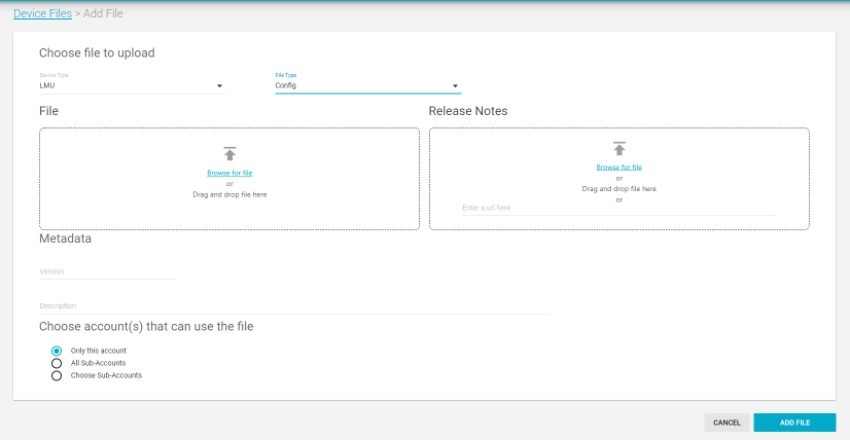
Adding a File
Note:
Once the file is added by a user, the system validates the file and updates the File Status. If status of the file is INVALID, click on Actions-> Edit at the right hand side of the row to view errors. Please make the required changes in file and update the uploaded file and click on Add File.
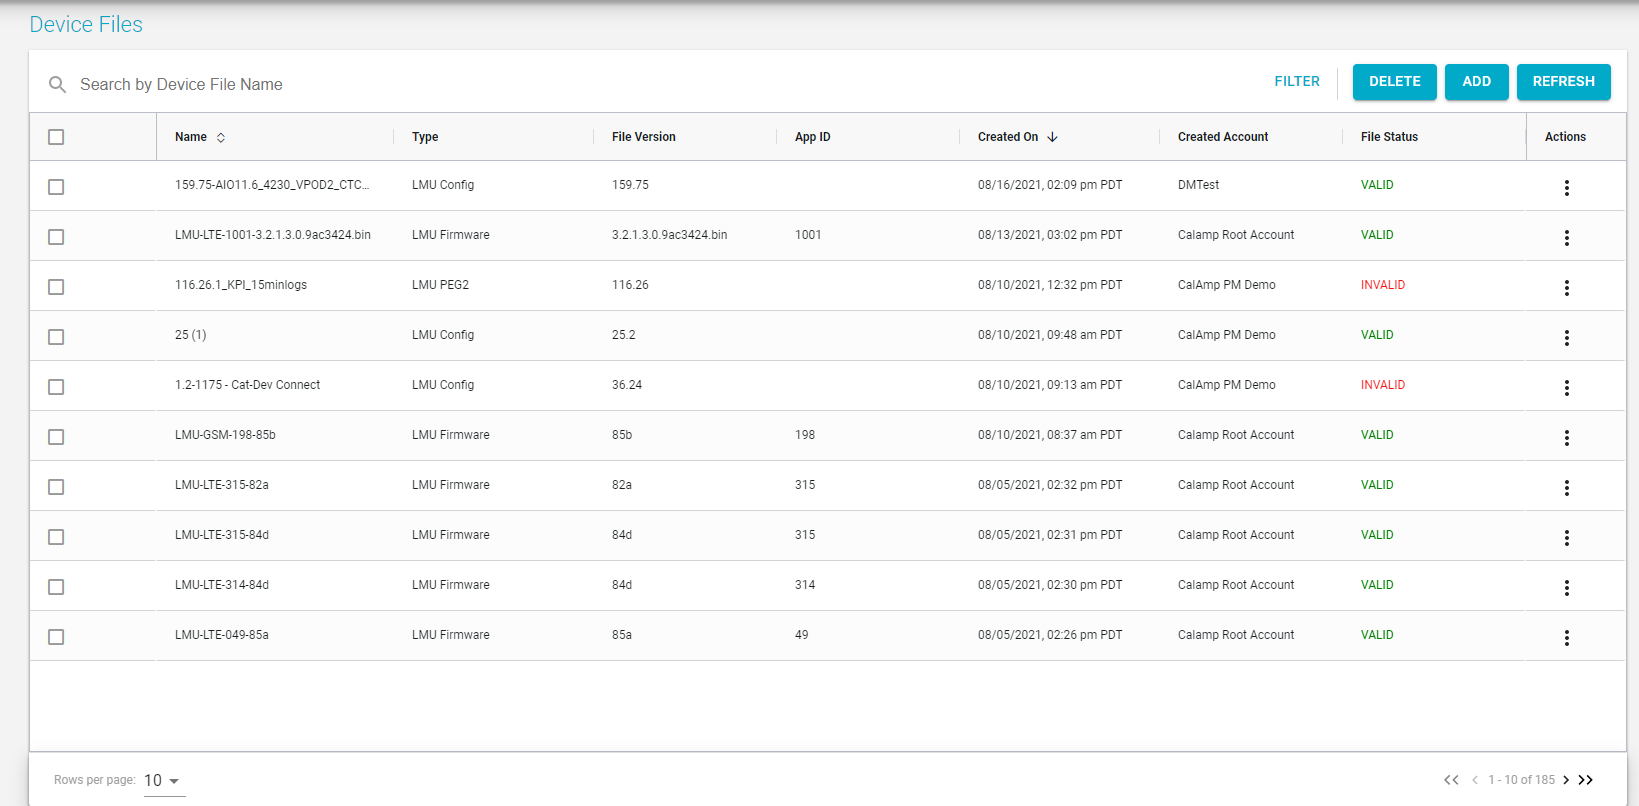
View/Delete Files
View the details of the uploaded files by clicking on Actions. Delete your files from account based on the permissions that the user account has.
Alerts
This module can be used to create alerts and check notifications for alerts.
Alerts Setup: Add alerts by choosing pre-canned alert types and provide destination such as SMS/EMAIL/URL POST/MOBILE PUSH. Alerts can be updated or deleted as well.
Notifications: The notifications received from alerts can be seen here.
Reports
This module can be used to view pre-canned reports available in CTC Admin UI and schedule those reports
Click on Add under Scheduled to schedule a report.
Following 3 reports are supported. Reports have circuit breakers. Real time reports cannot have more than 5000 records as of now, however, scheduled reports could have up to 100,000 records.
Device basic report: A basic report of devices.
Advance device details report: extended PULS .CSV equivalent report.
Admin
This module can be used to perform changes to an account, assets, system, users, or groups
Accounts - View account details here. Sub-accounts under a parent account can be viewed as well.
Assets - View all assets and related details.
Adding an Asset:
A. Click on Add on top right corner.
B. Fill the details of asset in pop-up window.
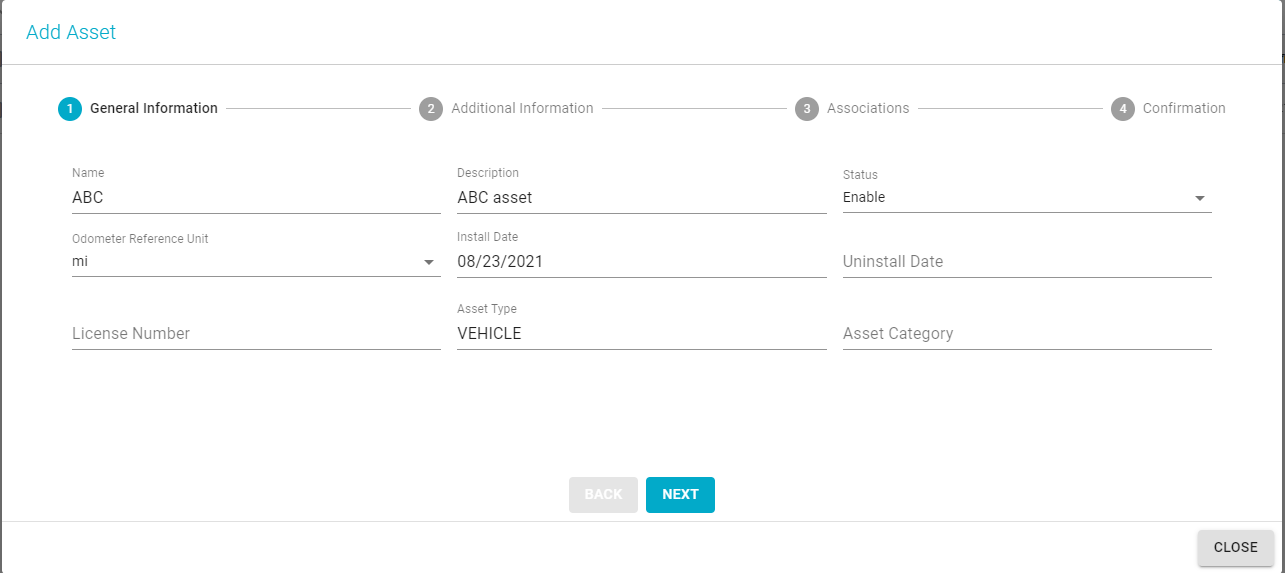
Adding an Asset
c. Fill the fields based on use case.
d. Select Devices or Assets to be associated with this Asset by clicking on the (+) button in page 3 of the pop-up window
e. Confirm to create asset.
Add Assets in Bulk
a. Click on Admin->Assets-> Actions->Import
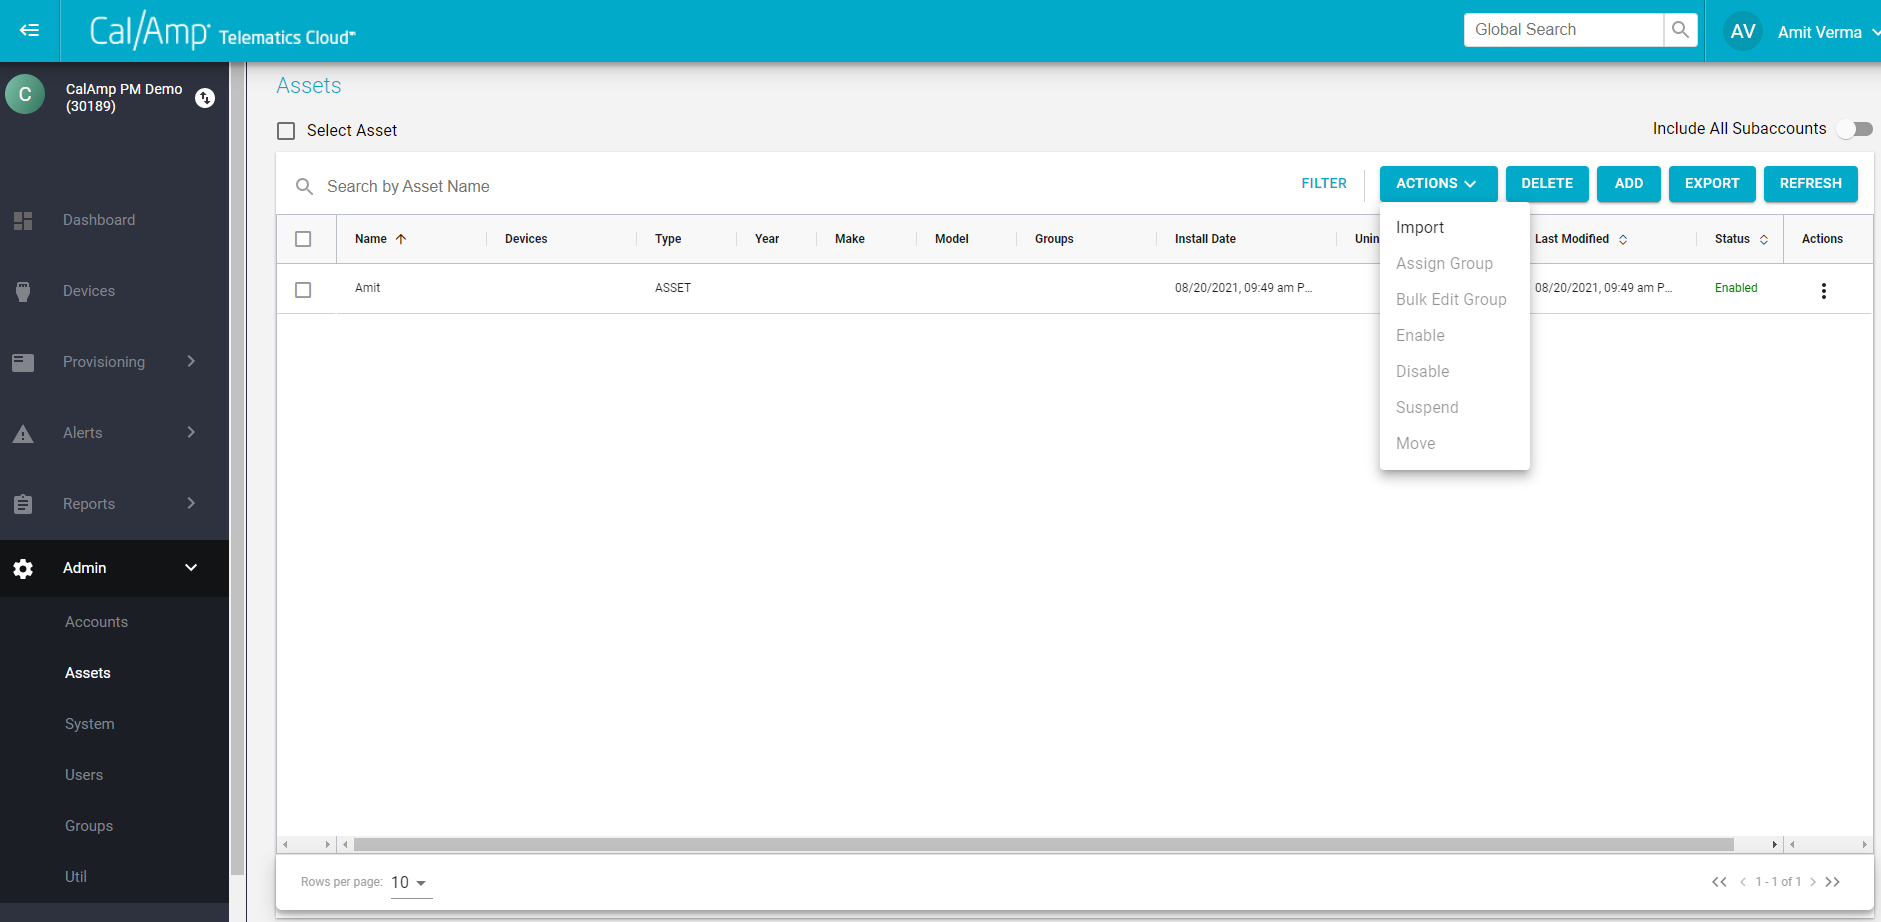
Adding an Asset in Bulk
b. Download blank template or Template with Assets to view the template for creating file to be uploaded in system.
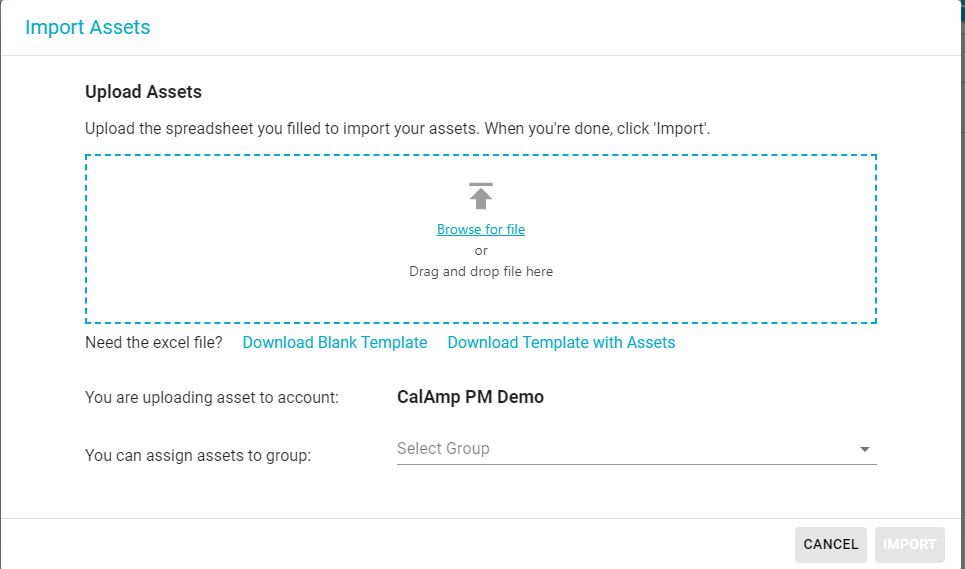
Upload Assets
c. Upload the file by clicking on Browse for file and selecting file or Drag and Drop File in the box.
d. If desired. select group name if to associate assets to a group.
e. Click on Import to create assets.
Search Assets
Search for assets in Admin-> Assets
a. Either type the name of the asset to search
Or
b. Click on Filter to use filters such as VIN, License number etc to search for matching asset.
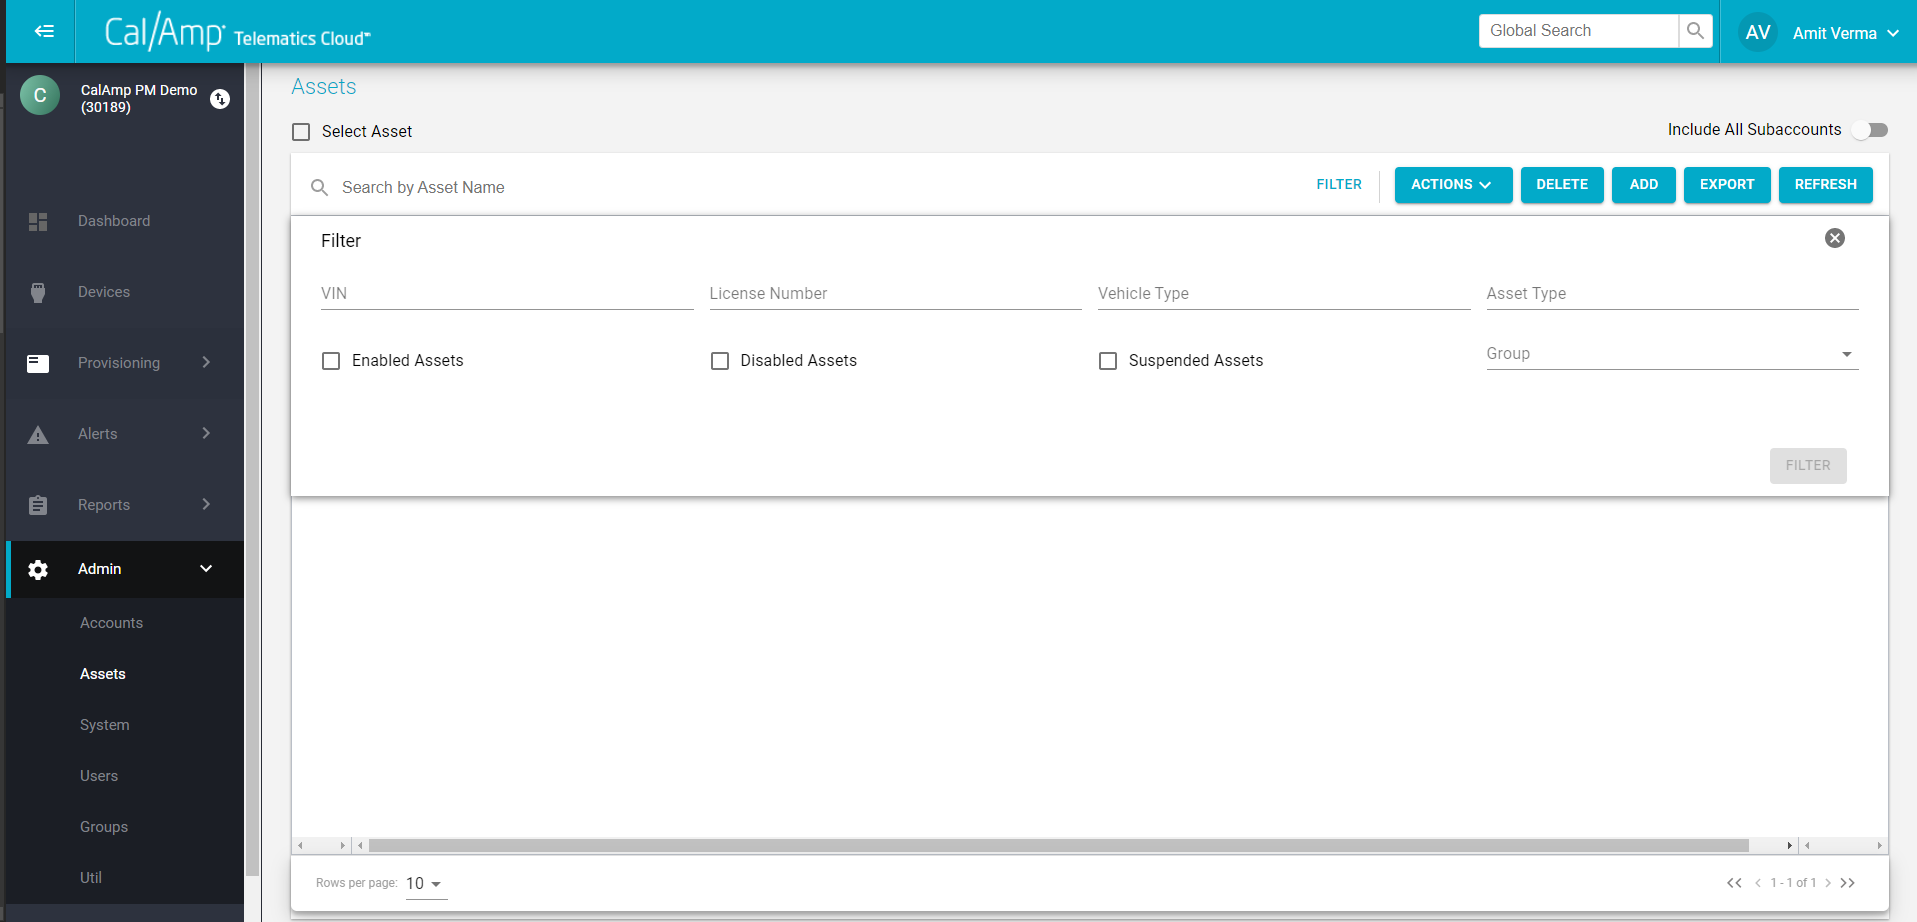
Asset Search
Delete Asset
a. Select assets by clicking on checkbox in the asset row.
b. Click on Delete in the top right corner
Export Asset
Assets details can be exported in a .csv by clicking on the Export button on top right corner in Admin->Assets
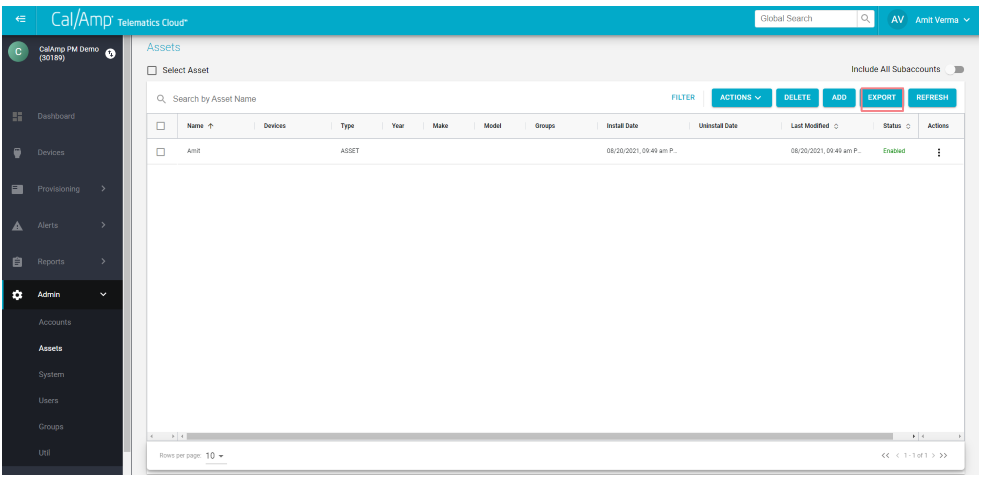
Asset Export
System - Create Device Configurations, PEG Behaviors, PEG Labels, and AEMP Configuration here.
NOTE: This section is applicable only if your organization use CalAmp Telematics Cloud's Datapump subscription.
Users - All user accounts can be created, deleted, or updated using this.
To add users:
- Click on Admin -> Users
- Click on Add on top right corner
- Fill in the details
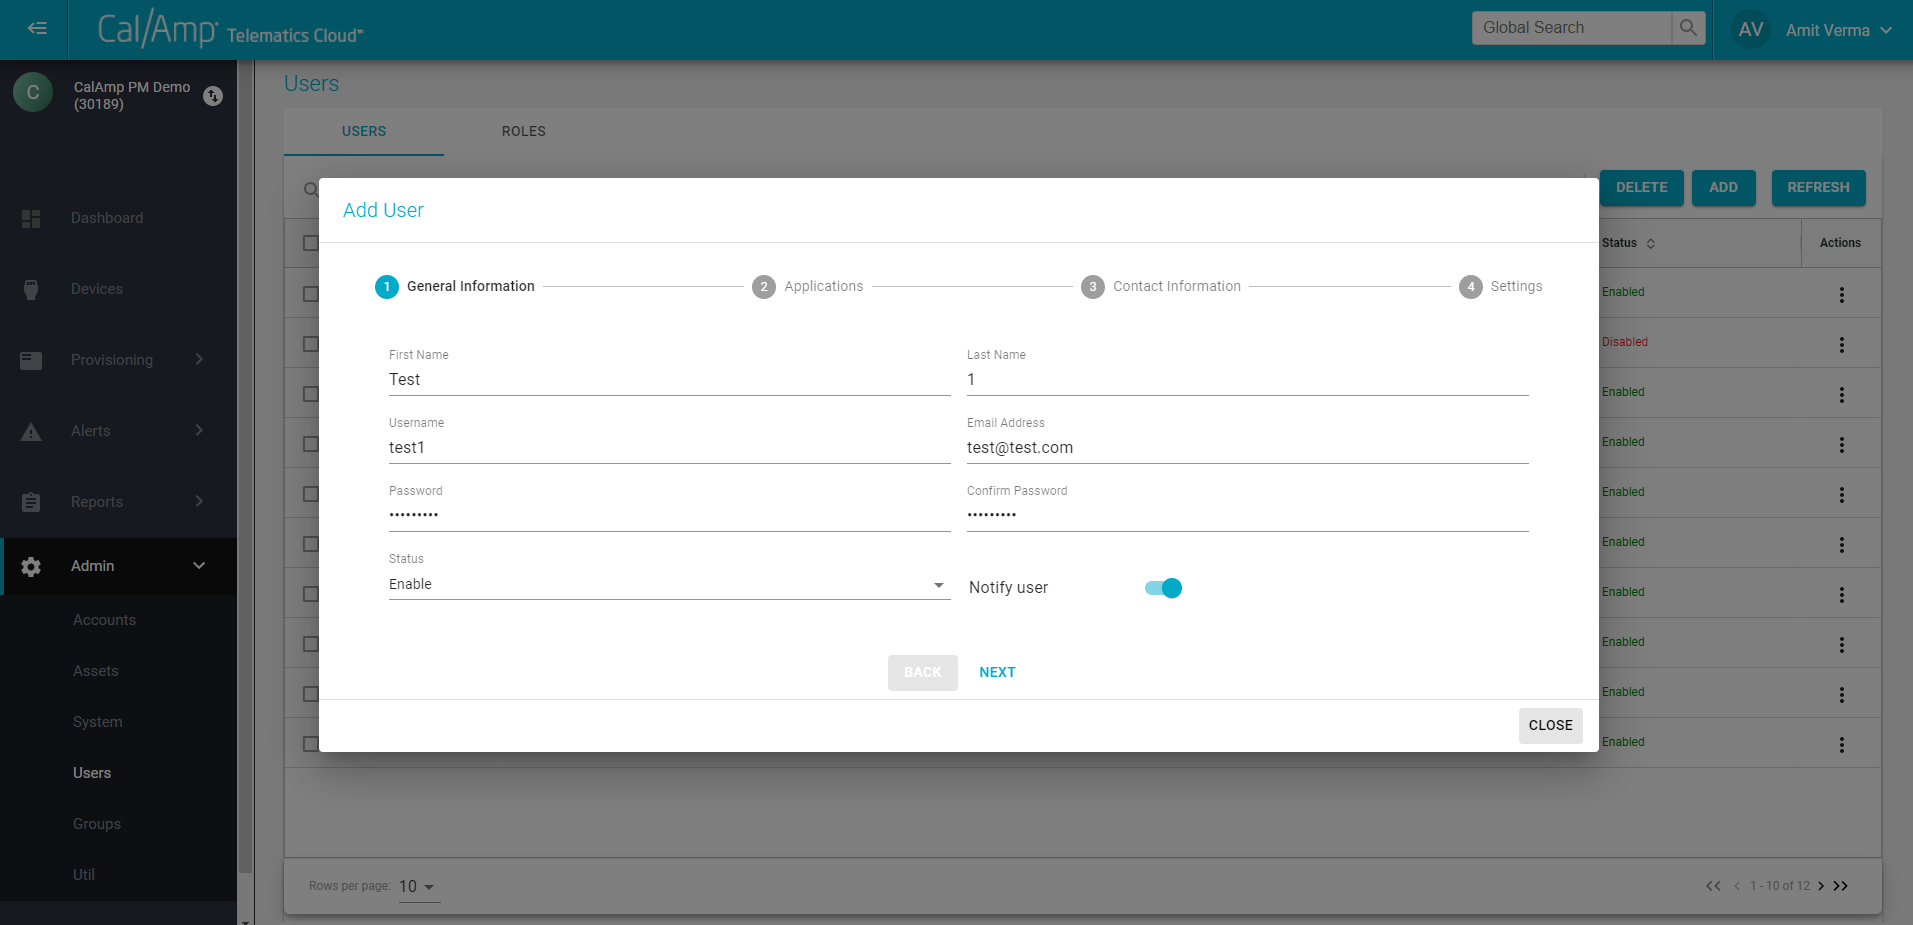
Add User
- Assign CTC Admin Application. Choose a Role (more info on role is provided in Self-Serve user Management section above).
- Confirm when all the mandatory fields are filled. User will receive an email if Notify User was chosen.
Create Custom Roles:
Customers can also create custom roles for their users from Roles Tab → Add
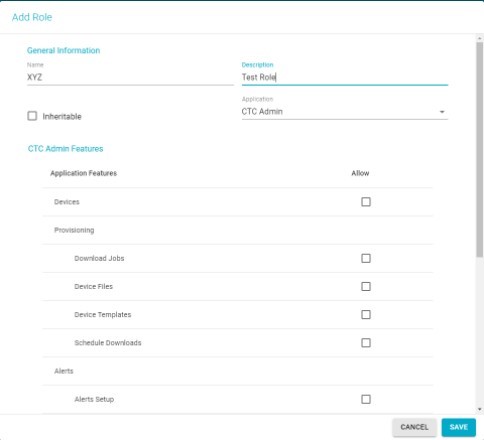
Add Role
Groups - All group details can be seen here. New groups can be created here as well.
Audit Logs
This module can be used to view system logs for Account/Asset/Device/Groups/Users.
Make the selection, type the name, and simply click on Search. Alternatively, click on Search to view all entities.

Audit Logs
Updated almost 4 years ago
